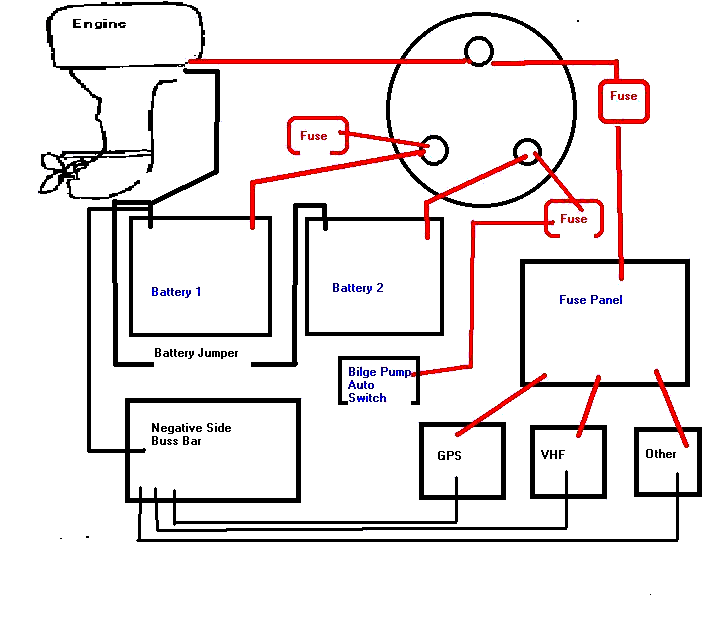
Your boat should be set up with two batterys and a battery switch. The primary reason to use two batterys is to have to ability to hold one in reserve in case of difficulties on the water. Many boats are set up with two battery systems that use a "starting" battery and another battery sometimes called a "house" battery, or the "electronics" battery; it may go by other name. This is, in my opnion, not a good way to set up most day boats. I prefer a method that uses a single battery at one time and holds the second battery in reserve. This system doen't require a battery isolator but it does require that the operator choose which battery will be used. It also alows the operator to decide which battery should be charged by the engine when running. I usually alternate which battery will be used and I do this by the simple adoptation of this method - my batterys are numbered 1 and 2. On even numberd days of the month I use battery number 2 and on odd numbered days I use battery number 1. Over time I think the use of the batterys will prove to be about equal.
Modern engines are quiped with alternators that put out plenty of power (ampers) to provide for your needs. These same engines are usually pretty easy to start and don't require long periods of engine cranking to get them going. This all works to your advantage. Understand something from the start. There are many different sorts of batterys. For boating purposes the two most common are "deep cycle" and "starting" batterys.
Deep cycle batterys are characterized primarily by thick plates with relatively low surface area. Starting batterys are generally constructed the other way around, they have thin plates (but more of them) and the plates offer up lots of surface area. Surface area - what's that and what does it have to do with anything? Batterys make electricity available for use via chemical reaction. All chemical reactions take place at the atomic level. What that means, quite simply, is that in order for electricity to be "made" (batterys don't actually make electricity but we aren't going to go into that) you have to have atoms of one sort bumping into (reacting with) atoms of another sort. The more surface area there is inside of the battery the more atoms there are to do their thing. How do you get more surface area? Pretty easy really. You can make more plates that are thinner (30 sheets of paper have much more surface area than one piece of cardboard of the same thickness) or you can stamp a design, any design, into the surface. The dimples on a golf ball give it more surface area than it would have if it were smooth.
Now all this is nice to know but in the end you have to say to yourself, so what? Well to crank your engine to start it requires a big jolt of power for a short period of time. Most folks think that requires a "starting battery with lots of thin plates (much surface area). On the other hand running a VHF radio on receive for hours on end just requires lots and lots of power dribbled out at a slow rate over a long period of time. So most folks pick up a deep cycle for runing their other electronics (most of which have useage properties much like the radio).
Here's a clue for you; you can use a deep cycle battery for any and every application in your boat including starting the engine. Its use will not do one single thing to hurt either the battery or the engine or any other electrical device for that matter.
OK, so how are we going to wire your boat? We are going to wire it so that although you have two batterys you will only be using one of them at a time. The second battery will be setting there as a spare, just in case something happens to the one you are using. Some days when you use the boat you will use one battery and some days you'll use the other one. You can figure out your own system for which one to use, it really doen't matter much at all. It is nice if you can use them about evenly but, once again its not absolutly necessary. There is one thing, with only one exception, that I may forget to tell you about later, you never want to run your boat using both batterys.
Now lets get it wired. Comming from your engine there are two battery cables, one positve (red usually) and one negative (black). You to buy a battery switch and on its back it will have three terminal lugs (bolt looking things that stick out). One of them is probaly marked something like "common" and the other two are marked (stamped into the plastic near each of them) something like A and B or 1 and 2 . You'll have to see what yours is like, and if you like you can easily see how the switch works with easily with either a test light or a voltmeter or an ohmmeter.
On the battery switch I want you to think about those three terminals this way: there is one (common) that is where the electricity comes out of the switch and there are two where it can go into the switch. I want you to take that positive (red) battery cable that is comming from the engineand which allows power to go into the engine and connect it to the terminal that is where the electricity comes out of the switch. This one is likely in the middle and the top one of the three on the back of the switch. It is the common one. There is one other wire, and only one, that is going to go to this terminal and I might as well tell you about it right now before you put the nut on the terminal and lock it down. The other wire that comes off of that terminal lug will be the one that supplies power to everything else on your boat except the bilge pump(s).
If you go to the local auto parts store you will be able to purchase a fuse holder for a single ATO or ATC type fuse. These are the flat type fuses that have two blades sticking out their bottoms. They are used in virtually every car in the world these days. They are the only sorts you should be using in your boat. Buy at least two of those fuse holders and make sure that you get the ones that have the heaviest wire you can find comming off their pig-tail leads. This fuse holder will have some sort of hole through it so that you can mount it. You are going to mount it close (within a foot) to your battery switch which should also be close to your batterys. . Take one of the leads from the fuse holder and attach (I'll get to methods of attachement in a moment) a ring connector to its end that is large enough to fit over the lug on the back of the battery switch. You may have to splice in a section of wire so you can get it into the back of the battery switch. That's just fine, go ahead and do it, but don't let that extension be any longer than you need to have it. Here is the first thing that you need to know, and most guys don't know it, the purpose of a fuse has absolutly nothing to do with protecting electrical equipment. A fuse is there to protect the wire. The fuse is in the line so that the wire does not get hot and catch on fire. Burning wires tend to light up other stuff around them. You really don't want that to happen when you are off shore somewhere. FUSES ARE IN THE LINE TO PROTECT THE WIRE! The length of wire between the lug on the back of the battery switch and the fuse is not protected. Make sure that section of wire is no longer than it has to be, once again, consider one foot to be the maximum. Now don't go nuts on this, you need to be able to reach the fuse to change it if necessary, just keep it as close as you can and within a foot of the switch is a real good.
OK, so now your engine is hooked up to your battery switch. Now lets get those batterys hooked up.
This part is easy as can be. Run the negative cable from your engine to the negative terminal on one of the batterys. Oh, your batterys are in battery boxes and held in place by some sort of tie-downs aren't they? Also, you've tossed those wing nuts that came with the battery and replaced them with self-lockin (nylock) stainless nuts haven't you? If you don't have battery boxes and tie downs go to your closest auto parts or Wal Mart and buy them and get the nuts too. You simply can not tighten wing nuts down properly and even if you could they won't stay tight. Stainless locking nuts (the ones with the little blob of nylon inside the top of the threads) won't come loose or corrode on you. Get a set of them, they'll be 5/16". Now you have to make up a jumper cable for the negative sides of both batterys. You can have most any auto parts store make up this cable for your but if you do they will crimp the terminal lugs on rather than solder them, solder is what you want. So do this, get the battery cable from your auto parts and pick up a pair of coper lugs while you are there. These lugs are the ones used to attach welding cable to electric welders. Take the mess home and solder the cable into the lugs. You can do this with a propane torch or even on your stove if you have to. Doing it with a torch is best. Heat up the lug and flux it well. When its hot enough melt solder into it until its almost full. Then plunge in your cable end (strip about 3/4" of the insulation off the end first of course). Once its in reheat the lug itself until the solder releases and then let it cool. This second heating will insure that the solder has penetrated the wires inside the cable. Don't worry if it bubbles up some of the insulation further back the cable. Try not to let the solder wick its way back up the wire any more than you can help but don't worry much about it. Now seal the connection with liquid electrical tape or better yet use 3-M 5200 on it for a sealer. As soon as you have the sealer on slip a large diameter section of shrink fit (available at a home supply place in the house electricals part) over the cable, joint, and end of the lug connector and shrink it down. the 5200 will set up over the course of time - don't worry about it . Now do the same for the other end. Make sure you slip the shrink fit over the cable for the other end before you start the rest of the process. With this cable made you need to connect it to the negative sides of each of your batterys. You also need to connect the negative cable from your engine to one of the batterys. Finally you need to connect a heavy wire (which you may choose to fuse just like you did the positive wire from the common side of the battery switch) from one of the battery's negative side and on to your grounding (negative side) buss bar. OK, now you have your grounds jumped and hooked up to the engine.
Next either make or buy two more battery cables, make sure that they are red, and connect the positive terminals of each battery to one of the input lugs on the back of the battery switch - one battery linked to one lug. There, now the input side of your electrical system is complete! Now, just before you button up everything on the back of the battery switch I want you to do this, I want you to run two more of those in-line fuse holders, one from each of the input lugs on the back of your battery switch. Just like the main line that you put on earlier that is hooked to the output (common) lug I want you to keep it within about a foot of the battery switch and I want you to use good heavy wire for the splice. You will be using one of these for power to your automatic switch for the main bilge pump. The other one is there sort of as a spare or is to be used as the power supply for the automatic switch for a second bilge pump if you use one. When you have all of these wires inplace I want you to tighten those nuts on the back of that battery switch down real good and then I want you to paint all three of them liberly with liquid electrical tape.
OK, your done. Here's what you have. The engine is connected to the common lug on the battery switch. Each battery's positive side is individually connected to one of the input lugs on the battery switch. the engine's negative cable is connected to one of the battery's negative terminals. Both of the batterys have their negative terminals linked together by a jumper battery cable. you have three in-line fuses comming off of your battery switch also. One of them is for main power and is comming from the common terminal. The other two are wired so that they are hot all the time, meaning that each one of them is wired to one of the input lugs on the back of the battery switch. All of your cable ends are sealed with some sort of goop
All in all it should look something like this:
And that should take care of it.